MONAI 0.7 : tutorials : モジュール – 3D 画像変換 (幾何学的変換) (翻訳/解説)
翻訳 : (株)クラスキャット セールスインフォメーション
作成日時 : 10/15/2021 (0.7.0)
* 本ページは、MONAI の以下のドキュメントを翻訳した上で適宜、補足説明したものです:
* サンプルコードの動作確認はしておりますが、必要な場合には適宜、追加改変しています。
* ご自由にリンクを張って頂いてかまいませんが、sales-info@classcat.com までご一報いただけると嬉しいです。

- 人工知能研究開発支援
- 人工知能研修サービス(経営者層向けオンサイト研修)
- テクニカルコンサルティングサービス
- 実証実験(プロトタイプ構築)
- アプリケーションへの実装
- 人工知能研修サービス
- PoC(概念実証)を失敗させないための支援
- テレワーク & オンライン授業を支援
- お住まいの地域に関係なく Web ブラウザからご参加頂けます。事前登録 が必要ですのでご注意ください。
- ウェビナー運用には弊社製品「ClassCat® Webinar」を利用しています。
◆ お問合せ : 本件に関するお問い合わせ先は下記までお願いいたします。
| 株式会社クラスキャット セールス・マーケティング本部 セールス・インフォメーション |
| E-Mail:sales-info@classcat.com ; WebSite: https://www.classcat.com/ ; Facebook |

MONAI 0.7 : tutorials : モジュール – 3D 画像変換 (幾何学的変換)
このノートブックは volumetric 画像の変換を実演します。
このノートブックは 3D 画像のための MONAI の変換モジュールを紹介します。
環境のセットアップ
!python -c "import monai" || pip install -q "monai-weekly[nibabel]"
!python -c "import matplotlib" || pip install -q matplotlib
from monai.transforms import (
    AddChanneld,
    LoadImage,
    LoadImaged,
    Orientationd,
    Rand3DElasticd,
    RandAffined,
    Spacingd,
)
from monai.config import print_config
from monai.apps import download_and_extract
import numpy as np
import matplotlib.pyplot as plt
import tempfile
import shutil
import os
import glob
インポートのセットアップ
# Copyright 2020 MONAI Consortium
# Licensed under the Apache License, Version 2.0 (the "License");
# you may not use this file except in compliance with the License.
# You may obtain a copy of the License at
#     http://www.apache.org/licenses/LICENSE-2.0
# Unless required by applicable law or agreed to in writing, software
# distributed under the License is distributed on an "AS IS" BASIS,
# WITHOUT WARRANTIES OR CONDITIONS OF ANY KIND, either express or implied.
# See the License for the specific language governing permissions and
# limitations under the License.


print_config()
MONAI version: 0.4.0+721.g75b7a446
Numpy version: 1.21.2
Pytorch version: 1.10.0a0+3fd9dcf
MONAI flags: HAS_EXT = False, USE_COMPILED = False
MONAI rev id: 75b7a4462647bfbe9bc8e7d8e5bff1238b87990d

Optional dependencies:
Pytorch Ignite version: 0.4.6
Nibabel version: 3.2.1
scikit-image version: 0.18.3
Pillow version: 8.2.0
Tensorboard version: 2.6.0
gdown version: 3.13.1
TorchVision version: 0.11.0a0
tqdm version: 4.62.1
lmdb version: 1.2.1
psutil version: 5.8.0
pandas version: 1.3.3
einops version: 0.3.2
transformers version: 4.10.2

For details about installing the optional dependencies, please visit:
    https://docs.monai.io/en/latest/installation.html#installing-the-recommended-dependencies
データディレクトリのセットアップ
MONAI_DATA_DIRECTORY 環境変数でディレクトリを指定できます。これは結果をセーブしてダウンロードを再利用することを可能にします。指定されない場合、一時ディレクトリが使用されます。
directory = os.environ.get("MONAI_DATA_DIRECTORY")
root_dir = tempfile.mkdtemp() if directory is None else directory
print(f"root dir is: {root_dir}")
root dir is: /workspace/data/medical
データセットのダウンロード
データセットをダウンロードして展開します。データセットは http://medicaldecathlon.com/ に由来します。
resource = "https://msd-for-monai.s3-us-west-2.amazonaws.com/Task09_Spleen.tar"
md5 = "410d4a301da4e5b2f6f86ec3ddba524e"

compressed_file = os.path.join(root_dir, "Task09_Spleen.tar")
data_dir = os.path.join(root_dir, "Task09_Spleen")
if not os.path.exists(data_dir):
    download_and_extract(resource, compressed_file, root_dir, md5)
MSD 脾臓データセット・パスを設定する
以下は Task09_Spleen/imagesTr と Task09_Spleen/labelsTr からの画像とラベルをペアにグループ化します。
train_images = sorted(
    glob.glob(os.path.join(data_dir, "imagesTr", "*.nii.gz")))
train_labels = sorted(
    glob.glob(os.path.join(data_dir, "labelsTr", "*.nii.gz")))
data_dicts = [
    {"image": image_name, "label": label_name}
    for image_name, label_name in zip(train_images, train_labels)
]
train_data_dicts, val_data_dicts = data_dicts[:-9], data_dicts[-9:]
画像ファイル名は辞書のリストに体系化されます。
train_data_dicts[0]
{'image': '/workspace/data/medical/Task09_Spleen/imagesTr/spleen_10.nii.gz',
 'label': '/workspace/data/medical/Task09_Spleen/labelsTr/spleen_10.nii.gz'}
データ辞書のリスト, train_data_dicts は PyTorch のデータローダで使用できます。
例えば :
from torch.utils.data import DataLoader

data_loader = DataLoader(train_data_dicts)
for training_sample in data_loader:
    # run the deep learning training with training_sample
このチュートリアルの残りは、最終的に深層学習モデルにより消費される train_data_dict をデータ配列に変換する「変換」のセットを提示します。
NIfTI ファイルをロードする
MONAI の一つの設計上の選択は、それは高位ワークフロー・コンポーネントだけでなく、最小限機能する形で比較的低位の API も提供することです。
例えば、LoadImage クラスは基礎となる Nibabel 画像ローダの単純な呼び出し可能なラッパーです。幾つかの必要なシステムパラメータでローダを構築した後、NIfTI ファイル名と共にローダインスタンスを呼び出すと画像データ配列とアフィン情報やボクセル・サイズのようなメタデータを返します。
loader = LoadImage(dtype=np.float32)
image, metadata = loader(train_data_dicts[0]["image"])
print(f"input: {train_data_dicts[0]['image']}")
print(f"image shape: {image.shape}")
print(f"image affine:\n{metadata['affine']}")
print(f"image pixdim:\n{metadata['pixdim']}")
input: /workspace/data/medical/Task09_Spleen/imagesTr/spleen_10.nii.gz
image shape: (512, 512, 55)
image affine:
[[   0.97656202    0.            0.         -499.02319336]
 [   0.            0.97656202    0.         -499.02319336]
 [   0.            0.            5.            0.        ]
 [   0.            0.            0.            1.        ]]
image pixdim:
[1.       0.976562 0.976562 5.       0.       0.       0.       0.      ]
多くの場合、入力のグループを訓練サンプルとしてロードすることを望みます。例えば教師あり画像セグメンテーション・ネットワークの訓練は訓練サンプルとして画像とラベルのペアを必要とします。
入力のグループが一貫して前処理されることを保証するため、MONAI はまた最小限機能する変換のための辞書ベースのインターフェイスも提供します。
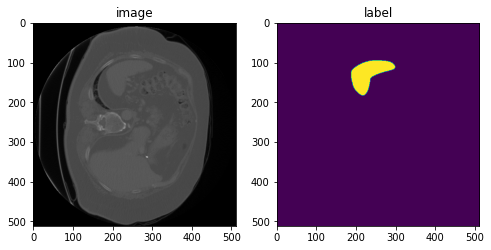
LoadImaged は LoadImage の対応する辞書ベース版です :
loader = LoadImaged(keys=("image", "label"))
data_dict = loader(train_data_dicts[0])
print(f"input:, {train_data_dicts[0]}")
print(f"image shape: {data_dict['image'].shape}")
print(f"label shape: {data_dict['label'].shape}")
print(f"image pixdim:\n{data_dict['image_meta_dict']['pixdim']}")
input:, {'image': '/workspace/data/medical/Task09_Spleen/imagesTr/spleen_10.nii.gz', 'label': '/workspace/data/medical/Task09_Spleen/labelsTr/spleen_10.nii.gz'}
image shape: (512, 512, 55)
label shape: (512, 512, 55)
image pixdim:
[1.       0.976562 0.976562 5.       0.       0.       0.       0.      ]
image, label = data_dict["image"], data_dict["label"]
plt.figure("visualize", (8, 4))
plt.subplot(1, 2, 1)
plt.title("image")
plt.imshow(image[:, :, 30], cmap="gray")
plt.subplot(1, 2, 2)
plt.title("label")
plt.imshow(label[:, :, 30])
plt.show()

チャネル次元を追加する
MONAI の画像変換の殆どは入力データが次の shape を持つことを仮定しています :
[num_channels, spatial_dim_1, spatial_dim_2, … ,spatial_dim_n]
(チャネル 1st は PyTorch で一般に使用されるので) それらが一貫して解釈できるためです 。
ここでは入力画像は shape (512, 512, 55) を持ちますが、これは受け入れられる shape ではありませんので (チャネル次元が欠落しています)、shape を更新するために呼び出される変換を作成します :
add_channel = AddChanneld(keys=["image", "label"])
datac_dict = add_channel(data_dict)
print(f"image shape: {datac_dict['image'].shape}")
image shape: (1, 512, 512, 55)
今は幾つかの強度と空間変換を行なう準備ができました。
一貫したボクセルサイズへの再サンプリング
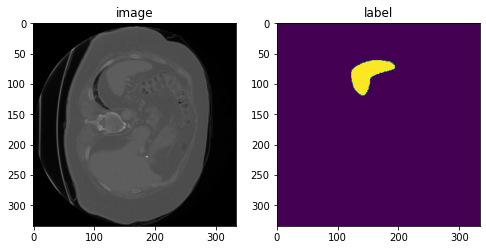
入力ボリュームは異なるボクセルサイズを持つかもしれません。以下の変換はボリュームが (1.5, 1.5, 5.) mm ボクセルサイズを持つように正規化するために作成します。変換は data_dict[‘image.affine’] からの元のボクセルサイズを読むように設定されています、これは対応する NIfTI ファイルからのもので、LoadImaged により先にロードされます。
spacing = Spacingd(keys=["image", "label"], pixdim=(
    1.5, 1.5, 5.0), mode=("bilinear", "nearest"))
data_dict = spacing(datac_dict)
print(f"image shape: {data_dict['image'].shape}")
print(f"label shape: {data_dict['label'].shape}")
print(f"image affine after Spacing:\n{data_dict['image_meta_dict']['affine']}")
print(f"label affine after Spacing:\n{data_dict['label_meta_dict']['affine']}")
image shape: (1, 334, 334, 55)
label shape: (1, 334, 334, 55)
image affine after Spacing:
[[   1.5           0.            0.         -499.02319336]
 [   0.            1.5           0.         -499.02319336]
 [   0.            0.            5.            0.        ]
 [   0.            0.            0.            1.        ]]
label affine after Spacing:
[[   1.5           0.            0.         -499.02319336]
 [   0.            1.5           0.         -499.02319336]
 [   0.            0.            5.            0.        ]
 [   0.            0.            0.            1.        ]]
spacing の変更を追跡するため、data_dict は Spacingd により更新されました :
- image.original_affine キーが data_dict に追加されて、元のアフィンを記録します。
- image.affine キーは現在のアフィンを持つように更新されます。
image, label = data_dict["image"], data_dict["label"]
plt.figure("visualise", (8, 4))
plt.subplot(1, 2, 1)
plt.title("image")
plt.imshow(image[0, :, :, 30], cmap="gray")
plt.subplot(1, 2, 2)
plt.title("label")
plt.imshow(label[0, :, :, 30])
plt.show()

指定された軸コードへの再方向付け (= Reorientation)
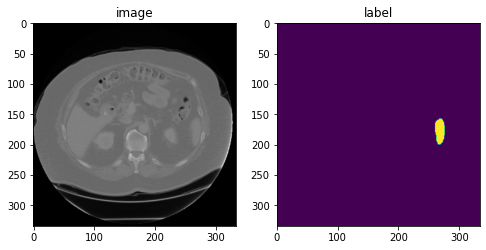
時に総ての入力ボリュームを一貫した軸方向にすることが望ましいです。デフォルトの軸ラベルは Left (L), Right (R), Posterior (P), Anterior (A), Inferior (I), Superior (S) です。以下の変換はボリュームを ‘Posterior, Left, Inferior’ (PLI) 方向を持つように再方向付けるために作成されます :
orientation = Orientationd(keys=["image", "label"], axcodes="PLI")
data_dict = orientation(data_dict)
print(f"image shape: {data_dict['image'].shape}")
print(f"label shape: {data_dict['label'].shape}")
print(f"image affine after Spacing:\n{data_dict['image_meta_dict']['affine']}")
print(f"label affine after Spacing:\n{data_dict['label_meta_dict']['affine']}")
image shape: (1, 334, 334, 55)
label shape: (1, 334, 334, 55)
image affine after Spacing:
[[  0.          -1.5          0.           0.47680664]
 [ -1.5          0.           0.           0.47680664]
 [  0.           0.          -5.         270.        ]
 [  0.           0.           0.           1.        ]]
label affine after Spacing:
[[  0.          -1.5          0.           0.47680664]
 [ -1.5          0.           0.           0.47680664]
 [  0.           0.          -5.         270.        ]
 [  0.           0.           0.           1.        ]]
image, label = data_dict["image"], data_dict["label"]
plt.figure("visualise", (8, 4))
plt.subplot(1, 2, 1)
plt.title("image")
plt.imshow(image[0, :, :, 30], cmap="gray")
plt.subplot(1, 2, 2)
plt.title("label")
plt.imshow(label[0, :, :, 30])
plt.show()

ランダムなアフィン変換
以下のアフィン変換は (300, 300, 50) 画像パッチを出力するように定義されています。パッチの一は x, y と z 軸のそれぞれについて (-40, 40), (-40, 40), (-2, 2) の範囲でランダムに選択されます。変換は画像の中心に対して相対的です。3D 回転角度は z 軸周りに (-45, 45) 度、そして x と y 軸周りに 5 度からランダムに選択されます。ランダムなスケーリング因子は各軸に沿って (1.0 – 0.15, 1.0 + 0.15) からランダムに選択されます。
rand_affine = RandAffined(
    keys=["image", "label"],
    mode=("bilinear", "nearest"),
    prob=1.0,
    spatial_size=(300, 300, 50),
    translate_range=(40, 40, 2),
    rotate_range=(np.pi / 36, np.pi / 36, np.pi / 4),
    scale_range=(0.15, 0.15, 0.15),
    padding_mode="border",
)
rand_affine.set_random_state(seed=123)
元の画像の様々なランダム化されたバージョンを生成するためにこのセルを再実行できます。
affined_data_dict = rand_affine(data_dict)
print(f"image shape: {affined_data_dict['image'].shape}")

image, label = affined_data_dict["image"][0], affined_data_dict["label"][0]
plt.figure("visualise", (8, 4))
plt.subplot(1, 2, 1)
plt.title("image")
plt.imshow(image[:, :, 15], cmap="gray")
plt.subplot(1, 2, 2)
plt.title("label")
plt.imshow(label[:, :, 15])
plt.show()
image shape: (1, 300, 300, 50)
ランダムな elastic 変形
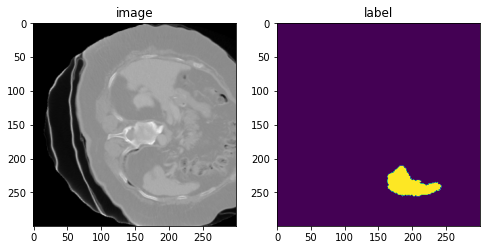
同様に、以下の elastic 変形は (300, 300, 10) 画像パッチを出力するように定義されています。画像はアフィン変換と elastic 変形の組み合わせから再サンプリングされます。sigma_range は変形の滑らかさを制御します (15 より大きいと CPU 上では遅くなる可能性があります)。magnitude_range は変形の振幅を制御します (500 より大きいと、画像が非現実的になります)。
rand_elastic = Rand3DElasticd(
    keys=["image", "label"],
    mode=("bilinear", "nearest"),
    prob=1.0,
    sigma_range=(5, 8),
    magnitude_range=(100, 200),
    spatial_size=(300, 300, 10),
    translate_range=(50, 50, 2),
    rotate_range=(np.pi / 36, np.pi / 36, np.pi),
    scale_range=(0.15, 0.15, 0.15),
    padding_mode="border",
)
rand_elastic.set_random_state(seed=123)
元の画像の様々なランダム化されたバージョンを生成するためにこのセルを再実行できます。
deformed_data_dict = rand_elastic(data_dict)
print(f"image shape: {deformed_data_dict['image'].shape}")

image, label = deformed_data_dict["image"][0], deformed_data_dict["label"][0]
plt.figure("visualise", (8, 4))
plt.subplot(1, 2, 1)
plt.title("image")
plt.imshow(image[:, :, 5], cmap="gray")
plt.subplot(1, 2, 2)
plt.title("label")
plt.imshow(label[:, :, 5])
plt.show()
image shape: (1, 300, 300, 10)

データディレクトリのクリーンアップ
一時ディレクトリが使用された場合にはディレクトリを削除します。
if directory is None:
    shutil.rmtree(root_dir)
以上
